Running targets in "FAKE - F# Make"
INFO
This documentation is for FAKE.exe before version 5 (or the non-netcore version). The documentation for FAKE 5 can be found here
Listing targets
Before running any specific target it is useful to know all the targets that are available in a build script. FAKE can list all the avaiable targets including the dependencies by running the following command:
- Fake.exe YourBuildScript -lt
The option -lt stands for "list targets". It is an abbreviation of the option --listTargets.
Running specific targets
FAKE has a special param "target" which can be used to run specific targets in a build. We assume the following build script:
1: 2: 3: 4: 5: 6: 7: 8: 9: 10: 11: 12: 13: 14: 15: 16: 17: 18: 19: 20: 21: 22: 23: 24: 25: |
|
Now we have the following options:
- Fake.exe "target=Build" --> starts the Build target and runs the dependency Clean
- Fake.exe Build --> starts the Build target and runs the dependency Clean
- Fake.exe Build --single-target --> starts only the Build target and runs no dependencies
- Fake.exe Build -st --> starts only the Build target and runs no dependencies
- Fake.exe --> starts the Deploy target (and runs the dependencies Clean and Build)
Final targets
Final targets can be used for TearDown functionality. These targets will be executed even if the build fails but have to be activated via ActivateFinalTarget().
1: 2: 3: 4: 5: 6: |
|
Build failure targets
Build failure targets can be used to execute tasks after a build failure. These targets will be executed only after a build failure but have to be activated via ActivateBuildFailureTarget().
1: 2: 3: 4: 5: 6: |
|
Visualising target dependencies
FAKE can output the graph of target dependencies in the DOT format, which can then be rendered to a PNG-file by Graphviz.
Specifying the command line option --dotGraph (short version: -dg) makes FAKE write the dependency graph to the standard output instead of building anything. This option only works when the build script contains a call like this:
1:
|
|
Example
Say, the build script build.fsx defines the target dependencies as follows:
1: 2: 3: 4: 5: |
|
The following command saves the target dependency graph in the graph.png file (PowerShell syntax):
1:
|
|
resulting in an image like this:

Using FAKE's parallel option
Since multithreading is beneficial (especially for large projects) FAKE allows to specify the number of threads used for traversing the dependency tree. This option of course only affects independent targets whereas dependent targets will still be exectued in order.
Setting the number of threads
The number of threads used can be set using the environment variable parallel-jobs.
This can be achieved in various ways where the easiest one is to use FAKE's built-in support for
setting environment variables:
FAKE.exe *YourBuildScript* "parallel-jobs=8"
Note that the dependency tree will be traversed as usual whenever setting parallel-jobs to a value <= 1 or omiting it entirely.
Issues
- Running targets in parallel is of course only possible when the target-functions themselves are thread-safe.
- Parallel execution may also cause races on stdout and build-logs may therefore be quite obfuscated.
- Error detection may suffer since it's not possible to determine a first error when targets are running in parallel
Due to these limitations it is recommended to use the standard sequential build whenever checking for errors (CI, etc.) However when a fast build is desired (and the project is e.g. known to build successfully) the parallel option might be helpful
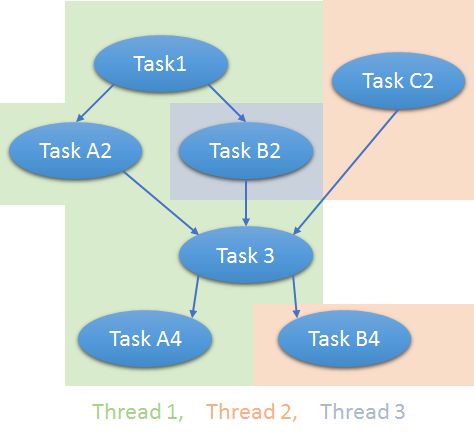
Example
When using this parallel option, Fake resolves the build dependency hierearchies from the described paths and builds independend paths as parallel if you have multiple CPUs available. For example this dependency tree:
1: 2: 3: 4: 5: 6: 7: 8: 9: 10: 11: 12: 13: 14: 15: 16: |
|
...would be treated as follows:
This is in addition to that that MSBuild may use multiple threads when building one solution having multiple independent project-files.
Writing custom C# tasks for FAKE
"FAKE - F# Make" is intended to be an extensible build framework and therefor it should be as easy as possible to create custom tasks. This tutorial shows how to create a (very simple) custom task in C#.
Creating a custom task
Open Visual Studio and create a new C# class library called my MyCustomTask and create a class called RandomNumberTask:
1: 2: 3: 4: 5: 6: 7: 8: 9: 10: 11: 12: 13: |
|
Using the custom task
Compile the project and put the generated assembly into the tools/FAKE path of your project. Now you can use your CustomTask in the build script:
1: 2: 3: 4: 5: 6: 7: 8: 9: 10: 11: 12: 13: 14: |
|
If you want to use FAKE's standard functionality (like globbing) within your CustomTask project, just reference FakeLib.dll and explore the FAKE namespace.
Soft dependencies
Typically you will define dependencies among your targets using the ==> and <== operators, and these
dependencies define the order in which the targets are executed during a build.
You can also define soft dependencies among targets using the ?=> and <=? operators. For example, you might
say that target B has a soft dependency on target A:
1: 2: 3: |
|
With this soft dependency, running B will not require that A be run first. However it does mean that if A is run (due to other dependencies) it must be run before B.
Example
1: 2: 3: 4: 5: 6: 7: 8: 9: 10: 11: 12: 13: 14: 15: 16: |
|